Controlling DNS lookup sequence
also setup instructions for DNSKong

for Windows 9x


Understanding DNS lookup sequence

Pyrenean (eDextor's and DNSKong's author) offers us a good description of what happens in terms of DNS lookup sequence when using a remote proxy...

"On a standard configuration, the local IP cache gets checked, then hosts and then the DNS chain gets a chance to map the name to an IP."

When using an Internet (remote) proxy server, this is Pyrenean's description of what happens..

"Browsers pass proxy server requests to the Internet proxy without looking up the name on the local machine, or your ISP's DNS service. Hosts, TinyWeb, nor eDexter will work for those who use remote proxies."


The purpose of this tutorial is to show you how to clearly define DNS sequence lookup rules using Windows Networking Properties by telling Windows to always use localhost - 127.0.0.1 as the first DNS lookup service in the DNS chain.

This is advantageous to us when using DNSKong or the Windows hosts file because 127.0.0.1 is precisely what we want to be first in the lookup sequence.

This procedure is generally very effective if you are using cable modem, dial-up, or DSL and you have what I call "direct connection" meaning to say that you are not connected to the Internet via a remote proxy.

It should be noted that by default 127.0.0.1 is first in the chain and what we are accomplishing by applying this procedure is reinforcing the default.

If you are connected to the Internet using AOL, a custom dialer provided by your ISP, through a Local Area Network (LAN) connection or a remote proxy server these procedures may not be effective.


A brief tutorial


Step One: open your Networks properties dialog.
  • This can be done by right clicking on the Network Neighborhood icon on the desktop and then selecting properties.
  • Or open the Control Panel and double-click on Network icon to bring up the properties dialog


Step Two

Note: after completion of these steps
Windows may want the location
of your cab files or your CD-ROM
.

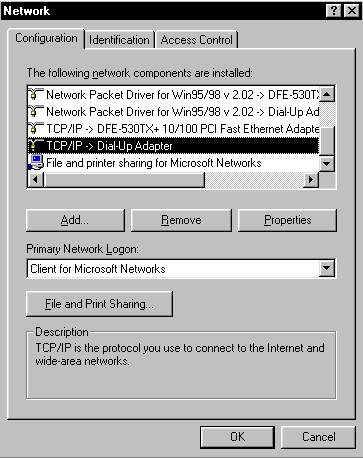
This is the first dialog box that will
come up. Select your TCP/IP ->
Internet connection. In this example
it is a Dial-Up adapter. In other cases
your Internet adapter could be an
Ethernet Adapter, or another type
of Adapter.

The important thing is for you is to
select the TCP/IP -> adapter that is
used to access the Internet for your
particular computer.

After selecting the proper adapter,
click the button that says,
"Properties" and proceed to the next
step.


dns1.jpg (35716 bytes)


Step Three: Use this step if   DNS
was not enabled.

If DNS was enabled skip these
instructions and follow the next
set of Step Three instructions.


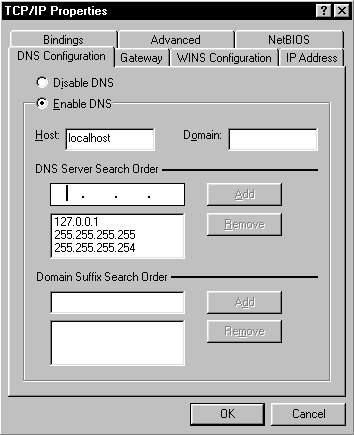
Select the DNS configuration tab as
shown. If DNS is disabled then click
the radio button to enable and add
the entries as shown.

This will instruct Windows use
localhost 127.0.01 as its first DNS
lookup. If Windows doesn't find the
URL in the hosts file it will proceed
to use your ISP's DNS lookup
configuration  and find the address of
the site your are wanting to connect
with. (at this point you may want
to also enter your ISP's DNS IPs even though they are not required because this also defines precisely what you want the lookup chain to be)


Click OK and this dialog box will close
and return you to the previous dialog
box and click OK again.

Windows will now probably want to
do its thing to reconfigure itself.

dns2.jpg (24596 bytes)


Step Three:  if DNS was enabled

This set of instructions substitutes
for the previous set of instructions if
you found that "Enable DNS" was
already activated. In this case make sure that the DNS Server Search Order
places 127.0.0.1 as the first server to
contact. See the example as to how
it should look when you are done.
the 255 entries are fictitious and used
for the purpose of illustration.

You will have to remove the
old entries and add them again
to get the desired DNS search
order.

After you have configured it as show
in the example on the right click OK
to return to the previous dialog box,
then click OK again and let Windows do
its thing.

dns3.jpg (26941 bytes)


[BACK]